Saturday, September 26, 2009
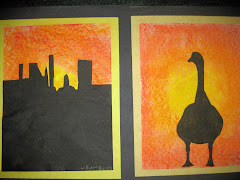
Positive/Negative Insects
Friday, September 25, 2009
Still Life

A lovely still life!
Set up a still life that can easily be seen. Do a sketch. Use water color or tempera to paint the basket and fruit. We also had a lesson on shading to show depth. Cezanne's still life is a good one to teach from.
Haunted House?
 Glue a long rectangle to a background paper, then add two roofs, a chimney and steps. Using oil pastels, draw details on the house including windows, logs, shingles, ghosts and goblins. A scarey tree and a large round moon help to make this house a hit!
Pastel Owl

Use pastels to make a large oval for an owl's body. Draw a circle on top which will be his head. Add a branch for him to sit on and your over half-way through with this creature of the night. Brightly colored feathers and big eyes make this owl stand out.
Googlie Eyed Spider

Have students draw a web on a square piece of paper with white chalk. Use black tempera to paint a large oval, circle and legs to form a spider. Glue on googlie eyes and your done!
Scarecrow

A fun scarecrow to cut and glue!
This is a great activity for learning shapes, use a square for the body, an oval for the head, and rectangles for the arms and legs. Add wall paper patches, a hat, and crows. Lastly, add straw cut in small pieces for hair, hands and feet.
Sponge Painting

Sponge painting is always an enjoyable activity. We drew fences with black cats or pumpkins on the paper first. Then we cut and glued on a tree trunk. The sponging was done last in several colors.
Torn Paper Jack-o-Lantern

A cute, easy pumpkin out of torn paper. Trace a circle on a piece of construction paper. Fill it in with torn orange paper. Make a stem and leaves. Make facial features out of black or yellow paper or print them with objects dipped in black paint.
Object Printed Jack-o-Lantern

This Jack-o-lantern is done on brown paper. Draw a pumpkin on the brown paper, then glue orange strips over it. Cut out a pumpkin from black paper, use the outside of the shape, glue it over the orange/brown paper. Use old thread spools dipped in paint to print the eyes, nose and mouth. Paint green leaves and vines then your done.
Sandpaper Printing
Sandpaper printing is one of my favorite activities. Just draw on a  medium grade piece of sandpaper. Color it evenly with crayons.Then put a piece of paper over the drawing, turn it over and iron the back of the sandpaper. The print looks like you did pointillism.Thus a lesson about George Seurat.
 medium grade piece of sandpaper. Color it evenly with crayons.Then put a piece of paper over the drawing, turn it over and iron the back of the sandpaper. The print looks like you did pointillism.Thus a lesson about George Seurat.
Thursday, September 24, 2009
Shading

Fourth thru Eighth grade can master this lesson in shading.
-use a large piece of construction paper and chalk
-use a white piece of chalk to lightly sketch at least 3 bottles
-turn the chalk on its side and color one side of all the bottles white and one side black. Press down lightly. Explain that the white side is where the light source is coming from.
-choose a color for the middle of each bottle
-use a paper towel to blend the chalk, don't let there be a line
-make a shadow under the bottles to show where they are sitting on a surface
Sunflowers

Painting sunflowers is a lesson the Kindergarten's love, although it is adaptable for lots of ages. We started with a:
- half sheet of construction paper fold and cut vase
-glue on a large paper and decorate with crayons
-demonstrate painting yellow flowers
-add brown middle
-lastly, add green stems and leaves
Picasso's Sunflowers was our source of inspiration!
Subscribe to:
Comments (Atom)